Preface
The purpose of this manual is to provide user information about the Hospital Admission \ Discharge \ Transfer \ Clinic \ Retail Sales \ Inventory \ Accounting module that is part of the Hospital Information System (HIS). Included in this manual is the information providing instructional guidance to a broad range of users within professional medical and healthcare communities in daily use of the HIS.
Contents
Registration with IC Card Reader 6
Ward In-Patient Registration / Admission 6
Registration without IC Card Reader 6
Print Patient Registration / Admission Form 7
Add Doctor to System for Wait List 8
Wait List Status (After Patient Visited Doctor) 9
Editing Doctor in Case Note 10
Clinic Medicine Prescription and Billing (used by Doctor) 11
Clinic Patient Billing (used by Doctor) 11
Inter-Clinic Stock Transfer / Stock Contra 11
Generating and Printing Daily Stock Report 12
Assigning Bed No. / Room No. 14
Deposit Charging for Hospital Admission 14
Daily Charging (Hospital - Ward Department) 14
Ward Transfer (Hospital / Nursing Home) 14
Ward In-Patient Billing / Discharge 15
Adding Header or Footer to Receipt 17
Viewing Sales By Customer/Stock/Invoice (duration period) 18
Create Stock Main File with Barcode 19
Setup Barcode Scanner Port (USB) 19
Setup Barcode Scanner Port (Serial) 20
Merge Stock (by Authorized Personnel only) 21
Delete Stock/Medication (by Authorized Personnel only) 21
Print Out Barcode label from system 21
Recalibrate Barcode Printer 22
Viewing Purchase By Supplier/Stock/Invoice (duration period) 23
Debit or Credit GL Transaction 25
Checking Periodic GL Ledger for Selected Account 25
Check for Monthly Sales to the Selected Customer 26
Debit or Credit AP Transaction 26
Check for Monthly Purchases 27
System Management (by Authorized Personnel only) 27
Create New Company in the System 27
Editing User (Editing Doctor) 28
Adding Department No. / Editing Dept. function 28
Doctor Consultation Fee Setup 29
Patient Registration
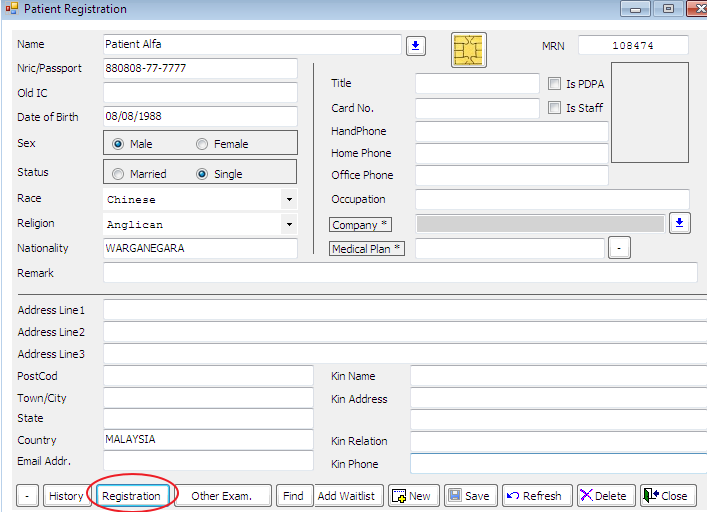
Registration with IC Card Reader
- Click [Patient].
- Under [Patient], click “Add Patient”.
- Put IC into IC card reader after getting it from patient, click “yellow button”.

- Data will be loaded to the [Patient Registration] and then click [save].
- Verify data getting from card reader (i.e. name, IC No., etc.) with patient and edit when necessary.
- Key-in [Kin Name], [Address], [Relation], [Phone], [Patient Handphone], [Home Phone], [Occupation] as these data won’t be available in the patient IC Card.
- Click [Save] to save Patient Registration.
Ward In-Patient Registration / Admission
- Click [Registration] to open [In-Patient] list window.
-
Search [In-Patient] list to identify the patient that want to check-in.

-
Key-in Doctor Name in [Attend Doctor] box.
- Click [Save] to complete assign doctor to the patient.
- After save, click [Bed No.] to key-in Bed No. For revisit patient, click select [Reg Date / Admit Date] first before clicking Bed No. Click [Save] to complete assigning bed.
- After save, click [DoctorF] to open Doctor Fee window. Key-in Doctor Account Code [Acc’t Code] to assign the patient to selected doctor.
- Click [Save] to complete Ward In-Patient Registration.
Registration without IC Card Reader
- Go to “Add Patient”
- Under [Patient], key-in data needed (i.e. name, IC No., address, handphone no.,date of birth, etc.) and then click [Save], verify data with patient.
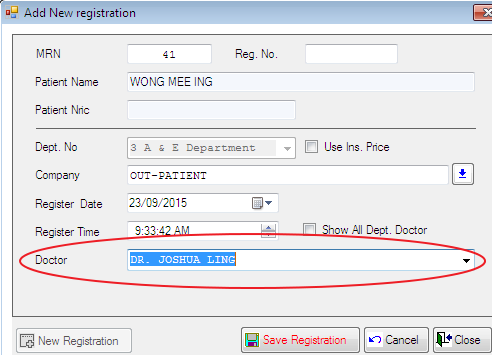
- Click [Add Waitlist] and [Add New Registration] window will open.
- Select Doctor (Name) you want from drop-down menu.
- Click [Save Registration].
- The selected patient will be added to [Wait List For XX/XX/20XX] under [Wait List].
Print Patient Registration / Admission Form
After Patient Registration, click [Save] to save Patient Registration data before click open [Registration].
- Click [Registration] to open [Patient Registration].
- Click select either [Out-Patient] for non ward-in patient or [In-Patient] for ward-in patient (only if you have not select it when you add new patient).
- Click [Save] to create [Reg. Date / Admit Date] and [Admiss. Form].
- Click open [Print Admission Form].
- Click select [Printer] to select printer if necessary.
- Click [Print] to print Patient Registration Form.
After Registration
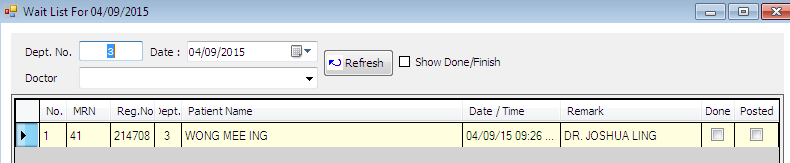
Wait List
If the doctor is available, the patient will be needed to add to the [Wait List] for that particular day (the day the patient register with the hospital/clinic).
Under [Wait List], you can view the list of patients waiting to see the doctor.
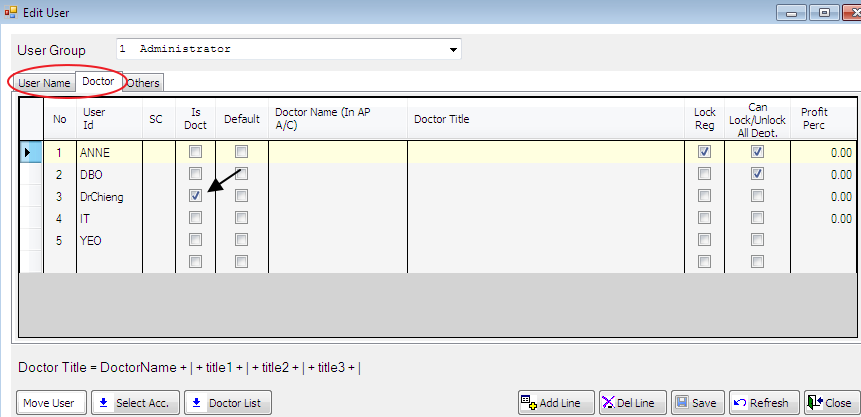
Add Doctor to System for Wait List
- Go to [User].
- If you have not created any user group for the doctor, please create one.
- After you create user group (Wait List box checked), go to [User] and click select [Add / Edit User].
- After selecting the correct [User Group], go to [User Name] and [Add Line].
- After [Add Line], key in [User Id] and [User Name] to add doctor.
- Go to [Doctor] under [Edit User], and check [Is Doct] box.
- Click [Save] to complete add doctor to Wait List [Doctor] selection menu.
Add Wait List
After patient registered, you can add patient to wait list for patients to wait for their turn to see doctor.
- Go to [Patient] and click select [Add Patient].
- After done with [Patient Registration] or you can start with click selecting patient name to [Look up Patient] to enter [Patient Registration].
- Click [Add Waitlist] to open [Add New Registration].
- Click select the [Doctor] that you want (You can check the “Show All Dept. Doctor” box).
-
Click [Save Registration] to complete add wait list.
Wait List Status (After Patient Visited Doctor)
The patient will be done with doctor. Under [Wait List For XX/XX/20XX] window, [Done] box will be tick.
Making Appointment
You can fix a date for your patient to see the doctor by making appointment.
- Go to [Patient]
- Select “Add Patient” from menu.
- Select patient (name) wanted to make appointment
-
After getting inside the [Patient History] window, click the box next to [Next Appointment]
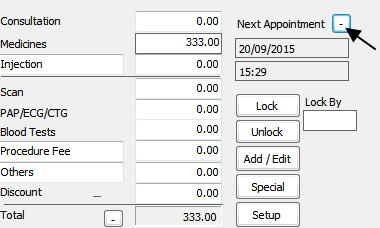
-
After you enter [Add New Appointment], select the date your patient wanted that matches the doctor date accordingly (recommend doctor to use this function for easy matching with patient date).
- After patient seeing doctor, nurse can check [Wait List For XX/XX/20XX] for patient’s status and making next appointment with doctor (either inform verbally or using Appointment Card for patient).
Clinic
Case Note (used by Doctor)
- Go to [Patient].
- Click select [Patient History].
- After [Patient History] open, click select [Patient Name] to open [Look-up Patient].
- Key-in [Complaint], [Examination], [Investigation], [Diagnosis] and [Management].
- Doctor can create [Complaints Abbr.] code by clicking the box next to [Complaint] for quick key-in of repetitive patient’s complaint.
- Doctor can also create examination abbr. code for repetitive [Examination Type] by clicking the [P] box next to [Examination] for quick key-in.
- Same Abbreviation code available to [Investigation], [Diagnosis] and [Management].
- Click [Save] to complete case note.
Editing Doctor in Case Note
- Go to [Patient].
- Click select [Patient History].
- After [Patient History] open, click select [Patient Name] to open [Look-up Patient].
- Click Add
 to open Add / Edit Case Note.
 - Select [Doctor] from drop-down menu.
- Click [Save] to complete editing doctor in Case Note.
Clinic Medicine Prescription and Billing (used by Doctor)
- Go to [Patient].
- Click the box
 beside [Name] field to search for patient that you want, double-click patient to select patient.
 - Click [History] to enter [Patient History] window.
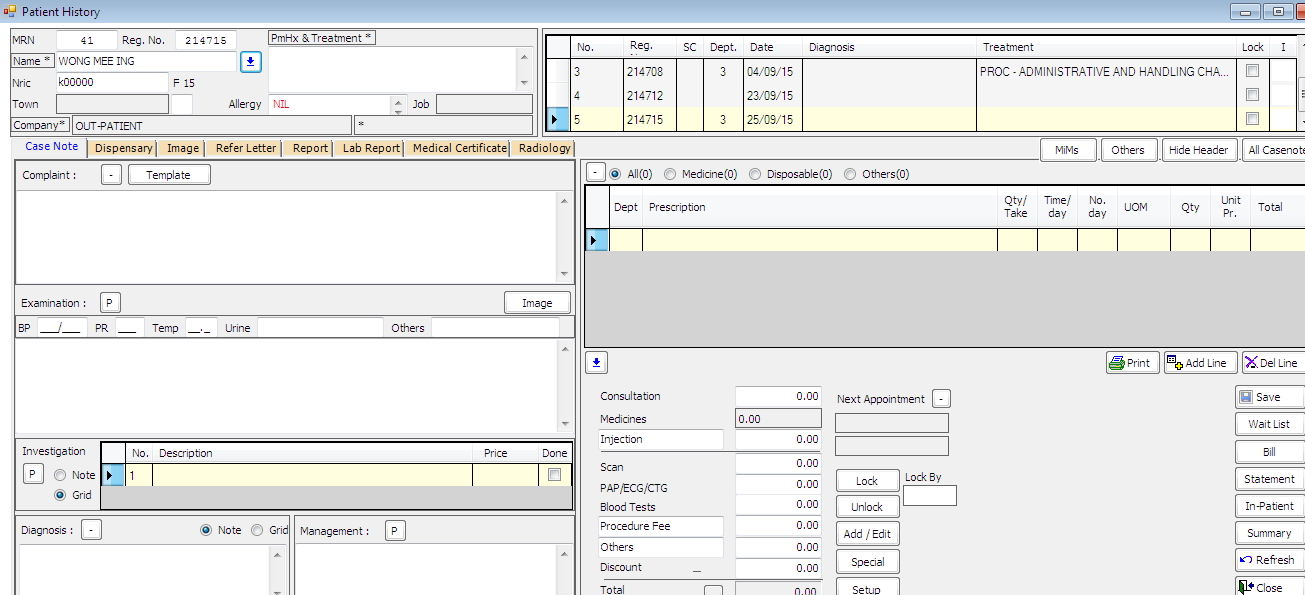
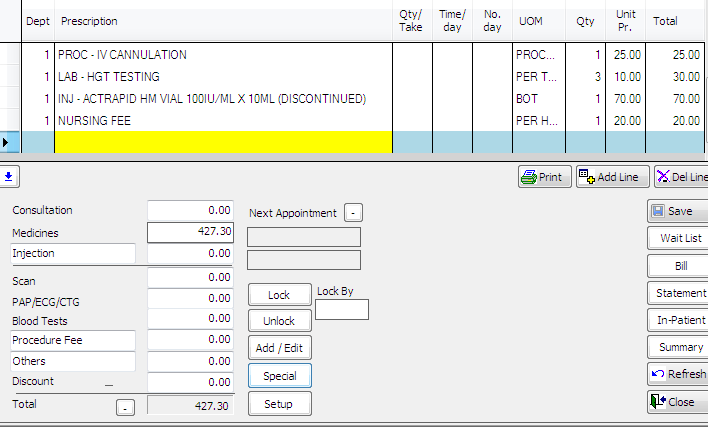
- Under [Patient History] window, click [add line] to key-in medicine name in the [Prescription] column, change [Qty] and [Unit Price] if needed.
-
Remove medicine, by click select the medicine, and then click [Del Line].
-
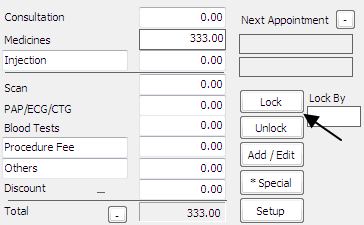
Doctor can [lock] the patient bill to confirm and finalize bill.
-
Click [Save] to complete prescribing medicine and billing patient.
Clinic Patient Billing (used by Doctor)
For Nurse / Clinic Assistant, you might want to request your doctor print [bill] to get the latest patient medicine bill.
- Under [Patient History], click [bill].
- After [Patient Bill] window open, you can finalize your patient bill by clicking [Statement] to preview your patient bill.
- After that, click [Post Bill] to Print Patient Bill.
- After [Print Patient Bill] window open, click [Print] to print bill.
Inter-Clinic Stock Transfer / Stock Contra
- Click [Patient].
- Under [Patient], click “Add Patient”.
- [Patient Registration] window open, key-in patient name or search for patient name.
- Click [History].
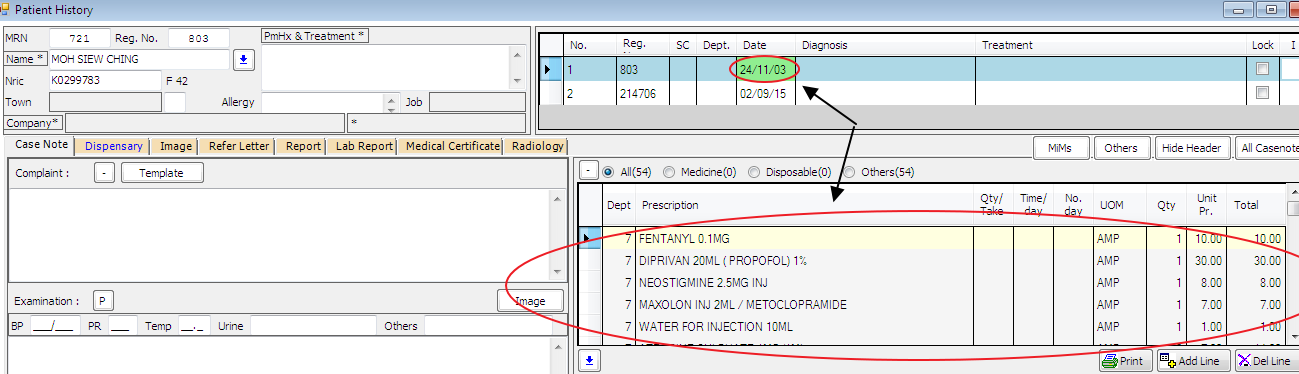
-
After [Patient History] window open, key-in stock items under [Prescription], key-in [Qty].
-
Key-in total price of stocks into [Discount] box (to contra the stocks that are transferring out from stock balance).
- Click [Save] to save change.
- Click [Bill] to change [Receipt No.] to date of internal transfer.
- Click [Save] to save change.
Generating and Printing Daily Stock Report
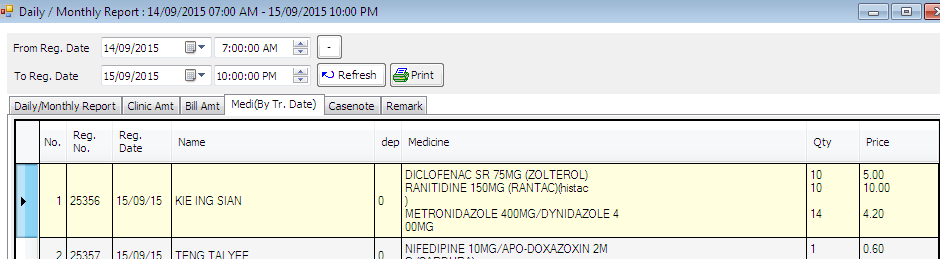
- Go to [Patient], click select [Daily / Monthly Report] to open [Daily / Monthly Report : XX/XX/20XX – XX/XX/20XX] window.
- Click [Medi(by Tr. Date)] and click select [From Reg. Date] and [To Reg. Date] that you want to generate the report from.
-
After select the date, click [Refresh] to generate report.
-
After generating report, click print to open [Print Daily report].
- After [Print Daily report] window open, check the button on the [Print Medication List].
-
After check, click [Print].
Note: Click [Closed] to close any Application Error.
X-Ray Fee
- After complete [Patient Registration], click select [Reg. Date / Admit Date] to choose the correct date patient visiting.
- Click [X-Ray] at the bottom of [Patient Registration] to open [X-Ray Fee].
- Click [Add Line] to add [X-Ray Code] and X-Ray Fee or [Del Line] to remove.
- You can search [X-Ray Code] and X-Ray Fee by clicking
 .
. - After adding, click [Save] to complete X-Ray Fee.
Printing X-Ray Fee Receipt
- Click [Post Bill] to print summary bill.
- After [Patient Bill] window open, click [Post Bill].
- After [Print Patient Bill] window open, click [Print] to complete printing summary bill.
- After printing summary bill, click [Payment / Refund] to open [Patient Payment].
- Click [Print Receipt] to open [Print Receipt] window.
- Click [Print] to print receipt for patient.
Lab Fee
- After complete [Patient Registration], click select [Reg. Date / Admit Date] to choose the correct date patient visiting.
- Click [Lab] at the bottom of [Patient Registration] to open [Lab Fee].
- Click [Add Line] to add [Test Id] and [Lab Fee] or [Del Line] to remove.
- You can search [Test Id] and [Lab Fee] by clicking
 .
. - After adding, click [Save] to complete Lab Fee.
Printing Lab Fee Receipt
- Click [Post Bill] to print summary bill.
- After [Patient Bill] window open, click [Post Bill].
- After [Print Patient Bill] window open, click [Print] to complete printing summary bill.
- After printing summary bill, click [Payment/Refund] to open [Patient Payment].
- Click [Print Receipt] to open [Print Receipt] window.
- Click [Print] to print receipt for patient.
Adding Doctor Fee
- After complete [Patient Registration], click select [Reg. Date / Admit Date] to choose the correct date patient visiting.
- Click [DoctorF] at the bottom of [Patient Registration] to open [Doctor Fee].
- Click [Add Line] to add [Acc’t Code] and [Doctor Name] or [Del Line] to remove.
- You can search [Acc’t Code] and [Doctor Name] by clicking
 .
. - After adding [Fee Amount], click [Save] to complete adding Doctor Fee to Bill.
Hospital
Assigning Bed No. / Room No.
- After In-Patient Registration, click select [Reg. Date / Admit Date] to choose the correct date patient admit to Hospital.
- Check the [In-Patient] to select the patient as In-Patient.
- Check the [Pay by Insurance] box if the patient is pay by insurance
- Click [Save] to save change.
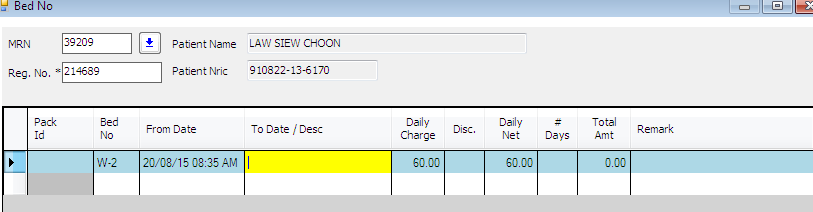
- Click [Bed No.] to open [Bed No.] window.
- Check the bed / room availability (refer to manual record).
- Click
 to search and select the Bed No. / Room No. that match patient’s need.
 - Click [Save] to complete assigning bed no. / room no.
Deposit Charging for Hospital Admission
- Go to [Registration] to open [Patient Registration].
- Click to open [Lookup Patient] and then click select patient name.
- After selecting patient and the correct [Reg. Date / Admit Date], click [Deposit].
- [Add Line] to key in deposit [Amount] (refer to the Main Doctor).
- Click [Save] to complete deposit charging.
-
Click [Print] to open [Print Deposit] window, click [Print] to print deposit receipt for patient deposit payment.
Note : same steps apply to Insurance Policy Beneficiary Patient.
Daily Charging (Hospital - Ward Department)
- Go to [Registration] to open [Patient Registration].
- Click to open [Lookup Patient] and then click select patient name.
- After selecting patient and the correct [Reg. Date / Admit Date], click [Medication] to open [Select Department] window.
- After [Select Department] open, click select [1. Ward Department] to enter [Medication – Dept 1. Ward Department].
- After [Medication – Dept 1. Ward Department] open, click [Add Line] to key-in items.
- Key-in “nursing fee / pulse oximeter monitoring” to add to [Medication – Dept 1. Ward Department] bill.
- Click [Save] to complete daily charging.
Ward Transfer (Hospital / Nursing Home)
- Go to [Registration], click [In Patient List].
- After [In Patient List] window open, click select “Patient Name”.
- After [Patient Registration] window open, click select the correct [Reg Date / Admit Date].
- After selecting the correct admit date, click [Bed No.].
- Key-in patient Ward Transfer-Out Date under [To Date / Desc] column.
- Click [Add Line] to add [Bed No.] to transfer the patient to that Bed No. / Ward / ICU.
- After adding [Bed No.], key-in Date and Time of transfer-in the new ward at the column of [From Date].
- Click [Save] to complete Ward Transfer.
Ward In-Patient Billing / Discharge
- Go to [Registration], click [In Patient List].
- After [In Patient List] window open, click select “Patient Name”.
- After [Patient Registration] window open, click select the correct [Reg Date / Admit Date] by referring to selected Patient Case Note (manual record).
- After selecting the correct admit date, click [Bed No.].
-
Key-in patient check-out date under [To Date / Desc] column. Click [Save] to save change.
-
After save, click [Medication] to open [Select Department].
- After open, click select [Ward Department].
- After [Medication – Dept. 1 Ward Department] window open, check and verify with The Patient Case Note (Manual Record) to ensure all patient bill record are the latest.
-
Same with all other patient bill i.e. X-Ray, Lab – blood test, A & E Dept., OT Dept.(Operation), DoctorF (Fee).

Note: After key-in and update each section of patient bill, remember to [Save] to save changes.
-
After save, go to [Patient Registration], key-in [Case] name by referring to In-Patient Discharge Summary (manual record). Click [Save] and click [Post Bill].
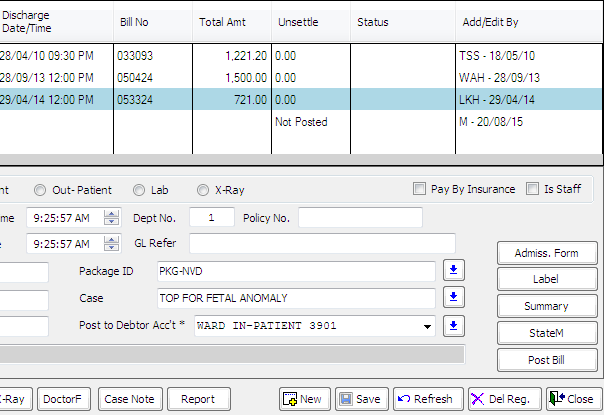
-
After [Patient Bill] window open, click [Post Bill].
-
After [Print Patient Bill] window open, click [Print] to print summary bill.
Warning : Don’t print receipt for Insurance Policy Beneficiary Patient due to payment will be received by Account Dept. at the later date.
-
After printing summary bill, click [Payment/Refund] to open [Patient Payment].
- Click [Print Receipt] to open [Print Receipt] window.
-
Click [Print] to print receipt for patient.
Note : Click [Closed] to close any Application Error.
Sales
Adding Customer
- Go to [Customer].
- Click select [Customer].
- Key-in [Customer Id], [Customer Name], [Address], [Phone], [Fax No.] and etc.
- Click [Save] to complete adding customer.
Counter Sales
- Go to [Customer], click select “Counter Sales”.
-
After [Counter Sales] window open, key-in [Stock Id] and press “enter”, stock name, quantity, unit price and etc. will appear. If you have barcode scanner, you can scan stock barcode to get stock name.
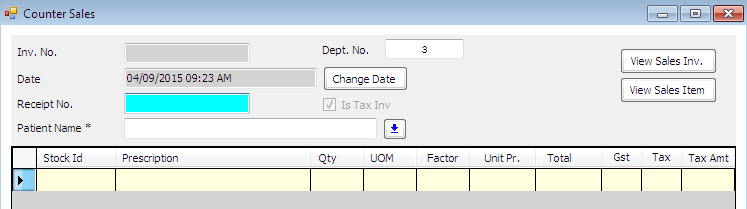
-
Click [Save] and [Check-Out] page will open.
-
Check if no mistake with Stock Name and Quantity, click [Save] again, then cashier printer will print receipt and cashier drawer will open for receiving cash.
Warning: Don’t delete receipt no. If deleted, receipt no. won’t follow in sequence order and there will be a missing receipt.
Adding Header or Footer to Receipt
-
Go to [Customer], click [Counter Sales] to open [Counter Sales] window.

-
Click box at the bottom left corner, click select [Pos Setting] to open [Pos Setting].
- Key-in the sentence you want on either header or footer or both.
- Every line of footer will need 2 blank lines or more at the end of invoice.
- Click [Save] to complete creating header or footer to your receipt.
Credit Sales
- Go to [Customer].
- Click select [Add/Edit Sales Invoice].
- After [Add/Edit Sales Invoice] window open, key-in your transaction type [Trans. Type], customer name into [Customer]
 or click
  to search customer name.
 -
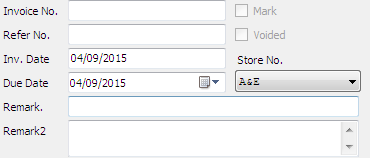
Key-in [Invoice No.], [Refer No.], [Inv. Date], [Due Date], [Store No.], [Stock Name].
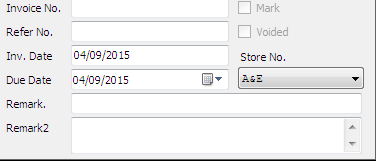
-
Edit [Qty], [Unit Pr.] if needed.

-
Click [Update Tax Amt] to get total amount with GST.
- Click [Save] to complete the sales invoice.
- Click [Print] to print sales invoice.
Viewing Sales By Customer/Stock/Invoice (duration period)
- Go to [Customer].
- Select [View Sales Item] from menu.
- You can either key-in customer / click to find and select customer if you want to view sales to the selected customer during the specified time period.
- Or Key-in stock / click to search stock if you want to view sales of the selected stock during the selected time period.
- Or select the duration period if you want to view the entire sales invoice during that period.
- Click [Refresh] to generate the listing that you want to view.
Inventory
Adding Stock Group
- Go to [Stock].
- From the menu, select [Stock Group] GL Acc.
- Click [Add Line] to add Stock Group for GL Acc.
- Key-in [Code] , [Group Name] , [GL A/C] code and [Sales A/C] code respectively.
- Click [Save] to complete adding Stock Group.
Adding Stock Category
- Go to [Stock].
- From the menu, select [Stock Category].
- Click [Add Line] to add Stock Category.
- Key-in [Code] and [Category Name].
- Click [Save] to complete adding Stock Category.
Adding Supplier
- Go to [Supplier].
- From the menu, select [Supplier] to open [Supplier Master File].
- Key-in [Supplier Id], [Supplier Name], [Supplier Address], [Supplier Phone] and etc.
- Click [Save] to complete Add Supplier.
Create Stock Main File with Barcode
Setup Barcode Scanner Port (USB)
- Install your barcode scanner driver (Window 7)
- Plug your barcode scanner into the USB port.
- Recalibrate Barcode Scanner using factory default setting and USB-COM-STD for the first time.
- If you want to use a different USB port, you need to setup a new port in HIS by going to [Config].
- After [Config], go to [Other Setup], click select [Barcode Reader].
- After [Barcode Reader] window open, click select your barcode scanner on the top left window.
- Key-in your pc name into the [Connect to this PC] box.
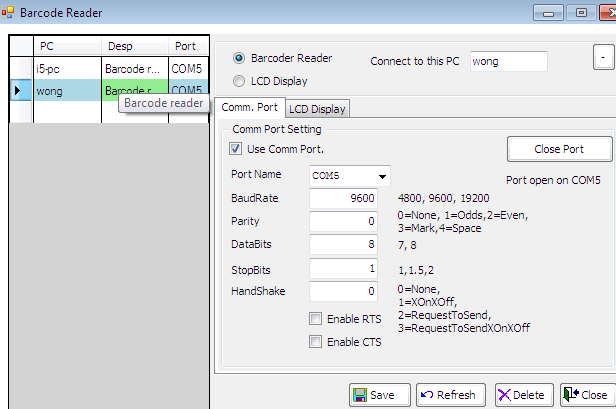
-
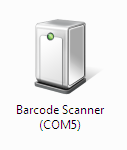
You can go to “Control Panel\Hardware and Sound\Devices and Printers”(Window 7)to identify your Barcode Scanner COM number, e.g. if you COM number is COM5 then change [Port Name] inside [Barcode Reader] window to COM5.
-
After identifying and creating COM port, click [Save] and exit.
- Re-enter [Barcode Reader] window, click [Open Port] to open port.
-
Click [Save] to complete setup the barcode scanner USB port.
Note : If you are using the same USB port but different version of HIS or relogin HIS, you just need to Open COM Port:
-
Go to [Config] and then [Other Setup].
- Click [Barcode Reader] and then click select PC that using the barcode reader.
- Click [Open Port] to open COM port and your barcode reader is ready to be used.
Setup Barcode Scanner Port (Serial)
- Make sure your barcode scanner is plug into the serial port and recalibrate using factory default setting for the first time.
- Go to [Config], and select [Other Setup].
- Click select [Barcode Reader].
- Check [Barcode Reader] option at the top of window.
- Key-in your pc name into the [Connect to this PC] box.
- Click the box next to the [Connect to this PC] box to create the serial port in HIS.
- Click [Comm Port Status] to open [Port Status] window.
- After create, re-enter [Barcode Reader] window and click [Open Port] to open port.
- Click [Save] to complete setup the serial port of barcode scanner.
Create Stock with Barcode
- Go to [Stock].
- Click select [Stock Item].
- After [Stock Main File] window open, click inside the [Barcode] box.
- Using your barcode scanner, you scan stock’s barcode into [Barcode] box.
- Key-in your [Stock Id] , [Stock Name] , [Stock Group] , [Category] , [Selling Price] , [POS Price] with GST , [Cost Price] and etc.
-
Click [Save] to complete creating stock with barcode.
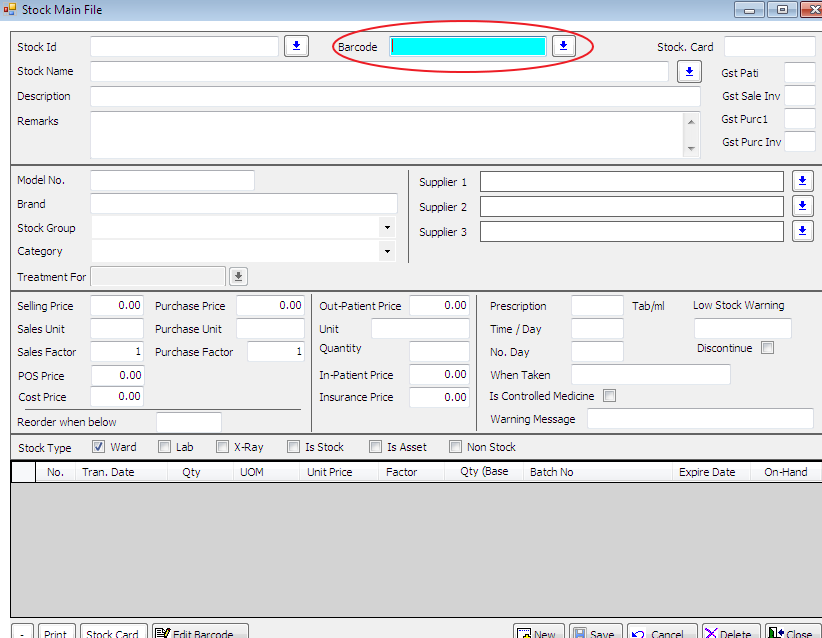
Note : Purchase Invoice transactions will appear at the bottom of [Stock Main File] after key-in the invoice.
Merge Stock (by Authorized Personnel only)
- Go to [Stock].
- Click [Stock Item] to open [Stock Main File].
- Click the bottom left corner box.
- Select [Merge Stock] from menu.
- Click select the [Stock Id] you want to merge from and the [Stock Id] you want to merge to.
- Click [Merge Stock] to complete merging stock.
Create Medication Price
- Go to [Stock].
- Click [Stock Item] to open [Stock Main File].
- After [Stock Main File] window open, click inside the [Barcode] box.
- Using your barcode scanner, you scan a medication’s barcode into [Barcode] box.
- Key-in your medication [Stock Id] , [Stock Name] , [Stock Group] , [Category] , [Supplier] , [Cost Price] , [In-Patient Price] , [Out-Patient Price] , [Insurance Price] , [Prescription] , [Time / Day] , [No. of Day] and etc.
-
Click [Save] to complete creating medication price.
Note: Every medication stock-in with expiry date will show at the bottom section of [Stock Main File].
Delete Stock/Medication (by Authorized Personnel only)
- Go to [Stock].
- Select [Stock Item] from menu.
- Search stock/key-in [Stock Id]/[Stock Name] that you want to delete.
- After selected stock appear, click [Delete] to delete stock.
Stock Costing
- Go to [Stock].
- Select [Stock Item] from menu.
- You will be at [Stock Main File] window, key-in stock name at [Stock Name] box or search stock name from at [Stock Id]

- Change [Purchase Price] accordingly at [Purchase Price] box.

- Click [Save] to save changes to cost of stock.
Print Out Barcode label from system
- Go to [Stock].
- Select [Print Barcode] from the menu.
- Find the Stock that you want to print out barcode, key-in number of copies you want to print in the field “Num. Of Copy”.
- Click [Print] to open [Print BarCode] .
- Select the barcode printer that you want.
- Click [Print] to print barcode.
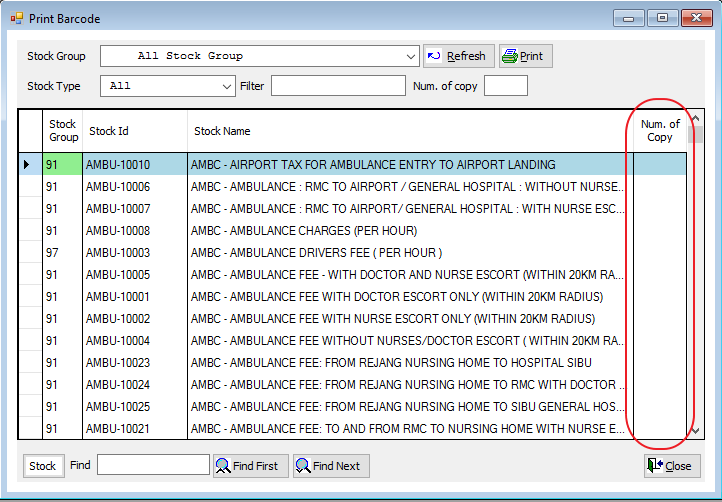
Note: All Stock ID under Stock Main File will auto generate by system.
Recalibrate Barcode Printer
If your barcode print-out is always out of alignment, you need to recalibrate barcode printer:
- Turn off the printer.
- While holding the Feed button, turn the printer back on. After the 2nd blink, let go of the Feed button.
- Press FEED once after the light returns to green. The printer should feed one whole label.
Stock Flow
Stock-In / Purchase
- Click [Supplier].
- Click [Add/Edit Purchase Invoice]
-
Click select transaction type [Trans. Type] box

-
Key-in supplier name in [Supplier] box or search for supplier name from box shown:
-
Key-in [Invoice No.], [Refer No.], [Inv. Date], [Due Date] same as [Inv. Date], click select [Store No.]
-
Key-in data i.e. [Stock Name], [Qty], Factor, Unit Pr. , Expire Date, etc., in selected column as shown below:

-
Click [Update Tax Amt] to get total amount.
- Click [Save] to complete purchase invoice.
Viewing Purchase By Supplier/Stock/Invoice (duration period)
- Go to [Supplier].
- Select [View Purchase Item] from menu.
- You can either key-in Supplier / click to find and select supplier if you want to view sales to the selected supplier during the specified time period.
- Or Key-in stock / click to search stock if you want to view purchase of the selected stock during the selected time period.
- Or select the duration period if you want to view the entire purchase invoice during that period.
- Click [Refresh] to generate the listing that you want to view.
Stock Transfer
- Go to [Stock].
- Click [Stock Transfer].
- Click select the transfer [Date], the sender [From Store] and the recipient [To Store].
- Click [Add Line] to add.
- Click
 to search stock and then click select stock that you want to transfer.
 - Key-in the [Qty] of the stock.
- Click [Save] to complete stock transfer.
Stock Adjustment
- Go to [Stock].
- Click [Stock Adjustment].
- Key-in your [Refer No.], [Stock Name].
- Adjust stock quantity by changing [Qty] to negative numbers to remove stock quantity from stock balance.
- Click [Add Line], key-in stock name and then add the correct stock quantity with positive numbers to [Qty].
- Click [Save] to complete stock adjustment.
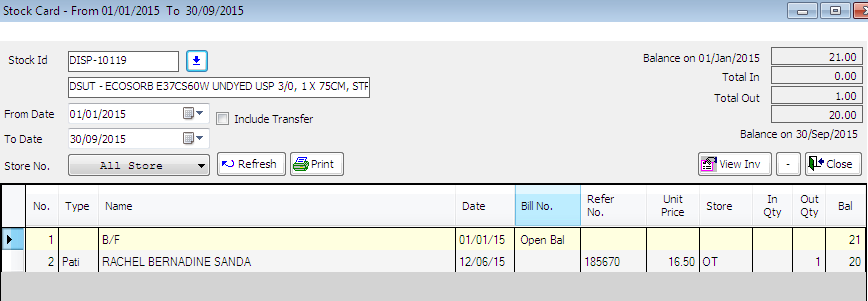
Stock Card
- Click [Stock].
- Under [Stock], click [Stock Report].
- Under [Stock Report], click [Stock Card].
- After [Stock Card] window open, key-in stock name and click select the correct duration period, e.g. monthly (01/08/2015 - 31/08/2015), daily (14/09/2015) to generate selected period stock card.
-
Click [Print] to print stock card for the selected period.
Stock On Hand
- Go to [Stock].
- Select [Stock Report] from the menu.
- Click [Stock On Hand – By Category] after [Stock Report].
- Choose the Date that you want.
- You can either select [Stock Category] particular/all category or [Stock Id] individual stock to search for stock on hand.
- Click select your [Store No.] i.e. your clinic or store from list.
- Left Click [Refresh] to generate stock on-hand report that you want
Near Expired Items
- Go to [Stock].
- Select [Stock Report] from the menu.
- Click select [Near Expired Items].
- Click the Date that items [Expired On].
- Click [Category] that to select the stock category that you want.
- Click [Store No.] to select the store / department that you want.
- Click [Refresh] to generate Near Expired Items report.
Accounting
Debit or Credit GL Transaction
- Go to GL Ledger.
- Select [Edit GL Transaction] to open [General Ledger].
- After [General Ledger] window open, click select [Trans.Type].
- Change the [Date] accordingly.
- Key-in your [Voucher No.] and [Refer No.]
- Click [Add Line] to add [Acc’t Code] and [Acc’t Name].
- Click select [Acc’t Code] and [Acc’t Name] that you want from
 .
. - Key-in [Dept.] No. , and [Description] if applicable.
- Key-in amount under [Debit] or [Credit] column.
- Click [Save] to complete GL Transaction.
- Click [Del Line] to delete line if necessary.
- Click [Save] to save changes.
Printing GL Transaction
- Go to [GL Ledger].
- Select [Edit GL Transaction] to open [General Ledger].
- After [General Ledger] window open, click [View GL Trans.] at the top right corner.
- After [GL Transaction List] open, click select [Tran. Type].
- Click select the date [From Date] and [To Date] that you want.
- After select the date, click [OK] to open [GL Transaction From XX/XX/20XX To XX/XX/20XX].
- After enter, click [Print] to open [Print AR Transaction].
- Click [Print] to print GL Transaction.
Note : 1. Click [Closed] to close any Application Error.
2. Same printing option available to AR and AP Transaction.
Checking Periodic GL Ledger for Selected Account
- Go to [GL Ledger].
- Select [GL Ledger] from menu.
- Key-in A/C No. and press enter.
- Choose the duration date that you want.
- Click [Ok] to generate periodic ledger for selected account.
Debit or Credit AR Transaction
- Go to [Customer].
- Select [Add / Edit AR Trans] to open [AR Transaction].
- Click select [Trans.Type].
- Click select [Customer] to find and select customer.
- Change date accordingly.
- Key-in your bill no. into the [Refer No.] box and key-in reference no. into second [Refer No.] box.
- Click [Add Line] to add [Acc’t Code], [Acc’t Name], and then click select [Acc’t Code] and [Acc’t Name] that you want from.
- Key-in [Dept.] No.
- Key-in amount under [Debit] or [Credit] column.
- Click [Save] to complete AR Transaction.
- Click [Del Line] to delete line if necessary.
- Click [Save] to save changes.
Check for Monthly Sales to the Selected Customer
- Go to [Customer].
- Click [Customer Ledger].
- Click [A/C No.] box to find and select “Customer Account Code”
- Select the date duration that you want.
- Click [OK] to generate report on all the sales to the selected customer during the time period that you want.
Debit or Credit AP Transaction
- Go to [Supplier].
- Select [Add / Edit AP Trans] to open [AP Transaction].
- Click select [Trans.Type].
- Click select [Supplier] to select supplier.
- Change date accordingly.
- Key-in your [Bill No.] and [Refer No.] if applicable.
- Click [Add Line] to add [Acc’t Code], [Acc’t Name], click select [Acc’t Code] and [Acc’t Name] that you want from.
- Key-in [Dept.] No.
- Key-in amount under [Debit] or [Credit] column.
- Click [Save] to complete AP Transaction.
- Click [Del Line] to delete line if necessary.
- Click [Save] to save changes.
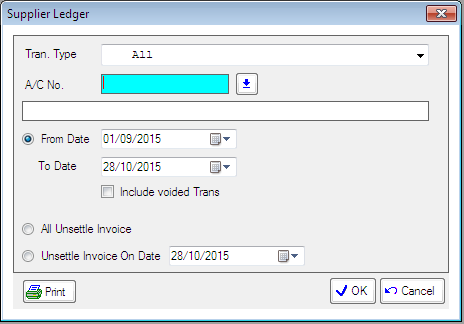
Check for Monthly Purchases
- Go to [Supplier].
- Click [Supplier Ledger].
- Click [A/C No.] box to find and select e.g. “Office Items Account Code”.
- Select the date duration that you want.
-
Click [OK] to generate report on all the expenses of office items during the time period that you want.
System Management (by Authorized Personnel only)
Create New Company in the System
- Go to [Config].
- Click select [System Config.].
- Go to [Company], key in [Company Name], [ROC], [GST Reg. No.], [Address], Telephone, Fax No. and etc.
- Click [Save] to complete creating Company.
Adding New User Group
- Go to [User].
- Click [User Group] from the menu.
- Click [Add Line] to add new user.
- Key-in “new user group name” in the [Description] column.
- Check the box for the specific function, e.g. wait list, ward function and can edit medi. price, assigning to the new user group.
- Click [Save] to complete adding new user group.
Group Access Control
- Go to [User].
- Select [Group Access Control] from menu.
- Click select the [User Group] that you want to edit the user access from drop-down menu.
- Click the tabs e.g. [Patient], [Registration], [Stock], [Supplier], [GL Ledger] and etc. that you want for different groups of functionality.
- Check the boxes for the functions that you are allowing group user to access, e.g. check the [Patient History] box to allow user view, add, edit and delete patient history.
- Click [Save] to complete editing group user access control.
User Access Control
- Go to [User].
- Select [User Access Control] from menu.
- Click select [User] from the drop-down menu.
- Select the tabs e.g. [Patient], [Registration], [GL Ledger], [Stock], [Supplier], and etc. that you want to add the function to the specific user.
- Check the box on top of column to add all the functions of that column if applicable.
- Click [Save] to complete editing specific user access control.
Add / Edit User
Adding New User
- Go to [User].
- Select [Add / Edit User] from menu.
- Click [Add Line] to add user.
- Key-in [User Id], [User Name] and [Password] to add new user.
- Click [Save] to complete adding new user.
Editing User (Editing Doctor)
- Go to [User].
- Select [Add / Edit User] from menu.
- Go to [Doctor] tab.
- Check [Is Doct] box for doctor to be appeared in [Patient Registration] drop-down menu and check [Lock Reg] box to lock bill.
- Click [Save] to complete editing user.
Adding Department No. / Editing Dept. function
- Go to [Config].
- Select [Other Setup] from menu.
- Click select [Department No.].
- After [Department No.] window open, click [Add Line] to add.
- Key-in [Department No.], [Department Name] and [Store No.].
- Check the box for assigning the designated function to the department, e.g. check [Is POS] and [Has Sale] box for assigning POS system and sales invoice functions to pharmacy store.
- Click [Save] to complete adding department no. and editing Dept. function.
Warning: Please don’t edit department no. so that you won’t delete case note’s department no., doctor name, doctor fee and etc.
Doctor Consultation Fee Setup
- Go to [Config].
- Select [Other Setup] from menu.
- Choose [Consultation Access Control] from submenu.
- Click [Access Control] to allow access control of selected group/individual staff.
- Check the selected box.
- Go to [Setup] to key-in doctor consultation fee according to their categories.
- After key-in, click [Save] to complete setup.
Note: Only Authorized Personnel is allowed to setup/change doctor consultation fee.
Knock Bill - Customer
- Go to [Customer].
- Select [Knock Bill – Customer].
- Key-in Customer Account No. at [Acc. No.].
- Click [Refresh] to generate all bills from the selected account.
- Select the bill that you want to knock off.
- Click [Knocked Bill].
Knock Bill – Supplier
- Go to [Supplier].
- Select [Knock Bill – Supplier].
- Key-in Supplier Account No. at [Acc. No.].
- Click [Refresh] to generate all bills from the selected account.
- Select the bill that you want to knock off.
- Click [Knocked Bill].